
Finding the Right Images for NPOs
It is much easier to extract all of your images and save them to a file before you start looking for the images that we need than it is to have to search for the image on the disk each and every time you want to pull an image.
Extracting Images & Saving Them as JPGs
I thought this was a pretty well-done video at directing from start to finish. I suggest you watch it in its entirety before you start the process of extracting your images from the disk. Once you’ve completed the extraction process, be sure to save the images in the file folder that you specifically created for them earlier in this unit. https://www.youtube.com/watch?v=6nTjBZ9COPU
The following is also printed in our Guidelines for Requesting Non-Professional Opinions (NPOs).
Finding The Images We Need For An NPO
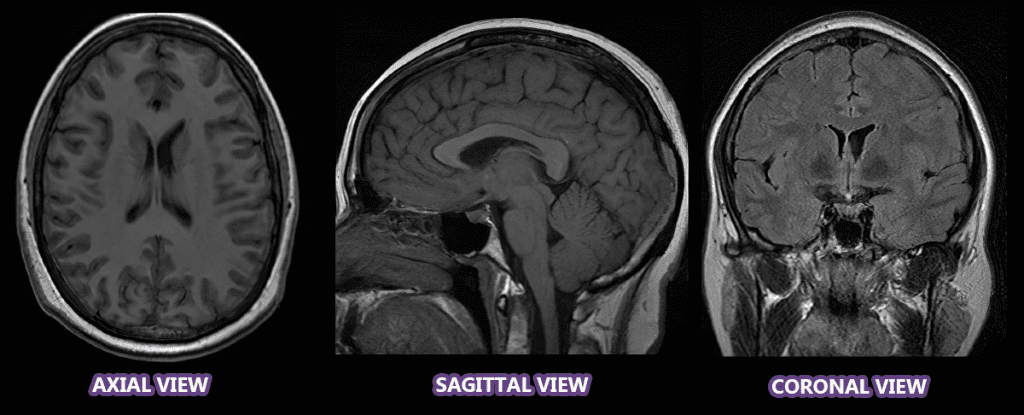
IN GENERAL, WE PRIMARILY PREFER SAGITTAL VIEWS:
- Sagittal views are slices taken from one side to the other, viewing it from the left perspective. While sagittal is our preference, other views can be helpful as well:
- Coronal views for instance are slices taken from the front to the back (so the left is really the right and vice-versa) and if you find the right slice, it can show if one cerebellar tonsil is lower than the other (it is also better for showing scoliosis).
- Axial views are slices from the top to the bottom, so they can be instrumental in finding leaks (especially when contrast was used), but since a leak can be cranial or spinal and can happen anywhere along the way, you have to go through them closely one slice at a time.
ALL IMAGES MUST BE PROPER MIDSLICES:
When we talk about midslices, we’re NOT talking about the middle slice on the disk (although it is often close to that), we’re talking about the image showing the middle section of your head/neck/spine.
What you need to look for:
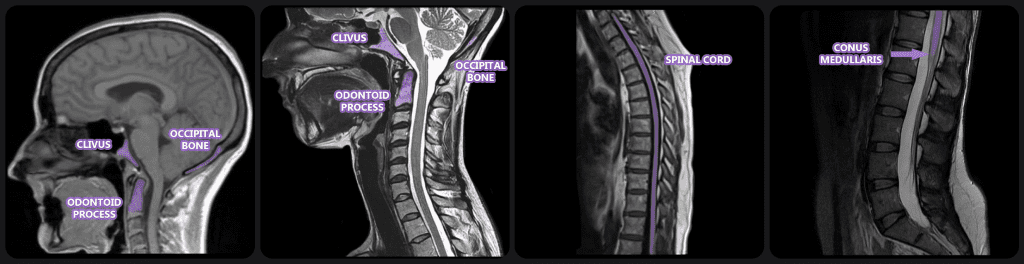
- A midslice of the brain (example) should clearly show an unobstructed view of three bones: the clivus, the occipital bone, and the odontoid process.
- A midslice of the cervical spine (example) should show the same three bones, but they will be slightly higher on the image.
- A midslice of the thoracic spine (example) should show the vertebrae and full spinal cord. When scoliosis is present, you will see the spinal cord clearly at one point and then almost disappear (and sometimes you will see it come back into clear view – depending on the location of the curves of the scoliosis).
- The spinal cord does not go as low as the vertebrae in the spinal column. The point in which it ends is called the conus medullaris and from there what continues down into the lumbar region is called the filum terminale. A midslice of the lumbar spine (example) should show the point where the spinal cord ends (conus medullaris) and the filum terminale begins.
We do make one exception to images being midslice and that is if there is the presence of a mass (cyst/tumor) or lesion (any of which can be anywhere in the brain and may not be visible in the midslice). If that is the only image given, that is the only thing that we will be commenting on (we will not pretend that it is a midslice and comment on it as though it was).
T2 WEIGHTED IS PREFERRED, BUT T1 IS PERMITTED AS WELL:
- On a T1 weighted image, the cerebrospinal fluid (CSF) is dark gray or black.
- On a T2 weighted image, the cerebrospinal fluid (CSF) is light gray or white. Having the CSF show up as white creates a better contrast that makes it easier to see certain things (such as intervertebral disc issues).
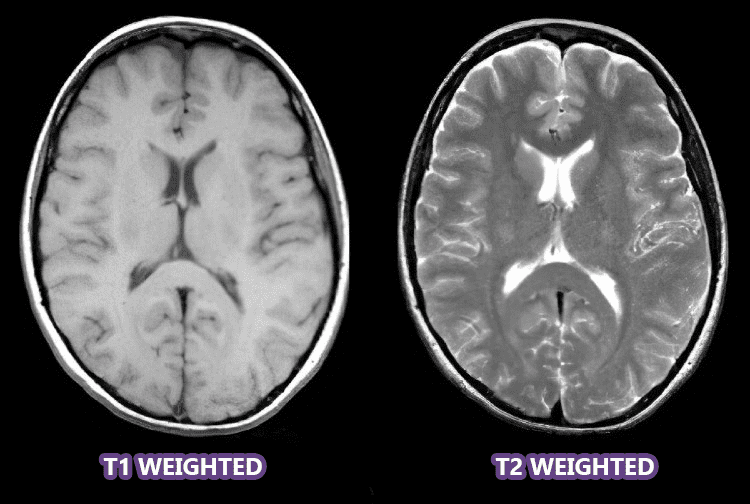
Image Size:
Small images make it hard for us to see what we’re looking for and even harder for us to try and mark what we see. Therefore, all images submitted should be cropped into a minimum of 500-800px. To accomplish this, please open the images full screen on your PC and either save them to size or use your snipping tool to snip them while they are large. Please DO NOT simply enlarge the picture as it reduces resolution that can compromise what can be seen.